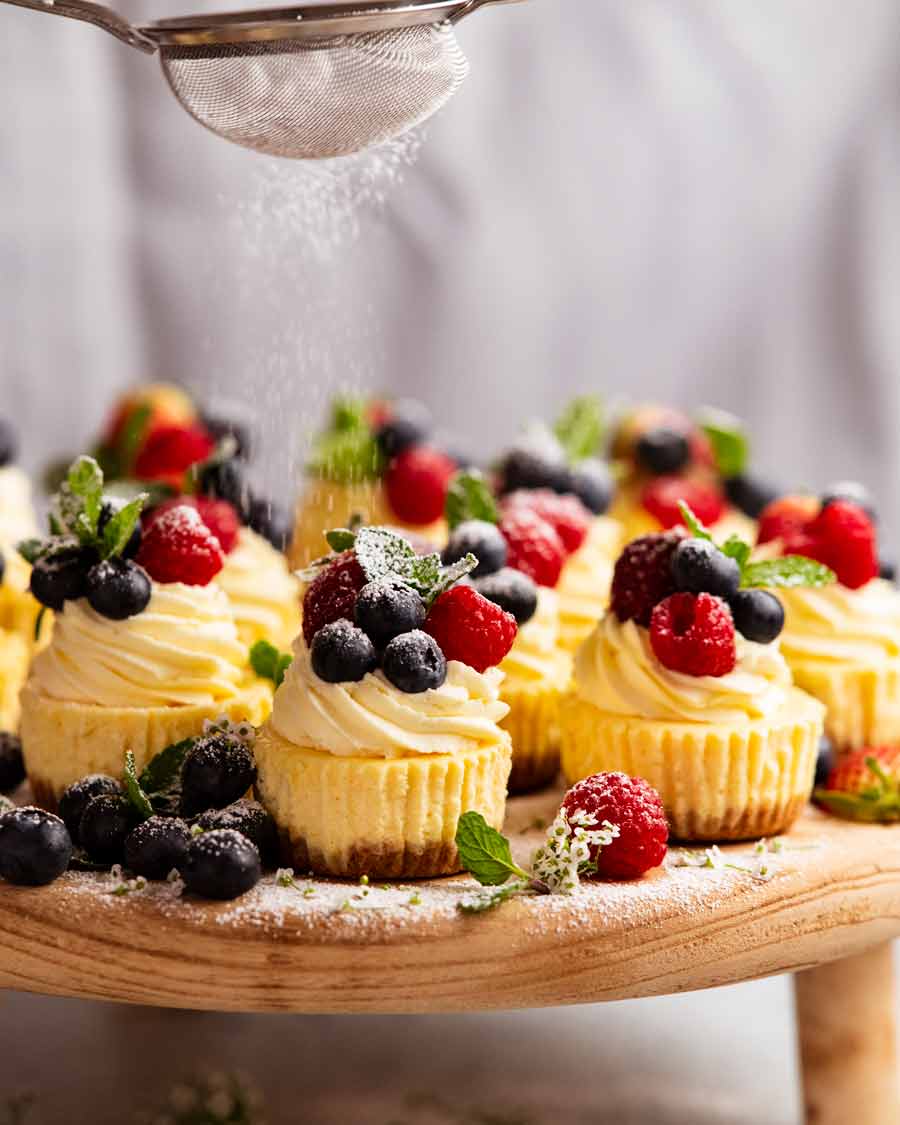
These adorable mini cheesecakes are made in a muffin tin! Easier to make than one large cheesecake, they’re pretty as a picture and a lot less messy to serve. Are you already visualising everybody’s gushing reaction when you turn up at your next gathering with a platter of these petite treats??
Mini cheesecakes
When it comes to party season, my dessert game plan is pretty predictable and heads in one of two directions.
If I have the time and really want to make a splash, I’ll go for a big statement piece like the famous Pavlova Christmas Tree or Never-Ending Meringue Tart, the latter aptly named because you can make it as impressively loooong as you want (4 metres / 12 feet is my record to date!)
Pavlova Christmas Tree
Never Ending Meringue Tart
But when I know I’ll be pressed for time – and the holiday season this year will be such a year – I’m always thinking what I can cook up for post-feast sweets that will still make an impact but without the stress. My tick boxes are for something low-risk, make-ahead, pretty, easy to transport and a guaranteed crowd pleaser.
Enter this year’s dessert to the rescue: Mini Cheesecakes! They’re easier to make than one large cheesecake (which are kind of fragile), with the convenience of side-stepping all the hassles of slicing and doling out with plates and cutlery. You can literally eat these with your hands like cupcakes.
And they are just adorable!
What you need for mini cheesecakes
Here’s what you need to make mini cheesecakes.
1. The biscuit base
Biscuits – My biscuit of choice for mini cheesecakes is digestive biscuits, for flavour and for the texture. These are a popular biscuit in the UK but also common in Australian grocery stores these days. They are firm but have a crumbly texture so they form crumbs easily, and are not as dry as other plain sweet biscuits.
Substitute with:
– Graham crackers: Very similar in both flavour and texture to Digestives.
– Arnott’s Marie crackers: I use these for large cheesecakes but I found the base a bit dry when I made these mini cheesecakes. However this is easily countered with some extra butter.
– Any other plain sweet biscuits: Just make the biscuit base as written and add a bit of extra butter if needed to achieve the “wet sand” texture you need.Butter – To add flavour and fat to the base, and as a binding so the biscuit crumbs coalesce into a solid base;
Sugar – For a little extra sweetness. We don’t need much.
Cinnamon – Optional, but I like the extra touch of flavour it brings to the biscuit base.
Salt – Just a pinch.
2. The cheesecake filling
The key to a creamy smooth cheesecake filling is to ensure the cold ingredients are at room temperature.
Cream cheese – The primary ingredient in cheesecake! I have always used Philadelphia cream cheese which is the best known cream cheese brand. Use the block sort not the creamy spreadable tub kind, which tends to be softer.
Full fat cream cheese is essential here! Low fat cream cheese won’t set as well and doesn’t have the same flavour. It’s all in or make something else, I say!
Sour cream – This might sound strange but sour cream lightens the cheesecake filling so it’s not as dense. This is a “secret ingredient” I use to make cheesecakes luscious but not overly rich.
You can probably get away with low fat but I haven’t tried it. Plain yogurt also works as a substitute.
Sugar – It’s best to use caster sugar / superfine sugar as the grains are smaller so they will dissolve more easily into the filling mixture. Regular sugar will work too but will require more beating to dissolve. This means your mixture will be more aerated which will lead to some surface bubbles on the cheesecake (not the end of the world though, as we cover it with cream!).
Flour – Just a bit, to provide a bit of stability to the filling and make it set. Without this, the filling sets a bit too flabby and loose.
Eggs – This is our binding agent for the filling that holds everything together. Eggs, the ultimate food glue!
Make sure the eggs are at room temperature and not fridge-cold. This way they will incorporate more easily into the batter and you won’t run the risk of curdling the mixture. Yup, been there, done that! To quickly bring eggs to room temperature, just submerge in warm water for 5 minutes.
Vanilla – For flavour. I like to use extract rather than imitation essence which is, well, fake. I don’t use real vanilla beans for general baking. I reserve that good stuff for special things like Creme Brûlée, Creme Anglaise (pouring custard).
Salt – It’s generally good baking practice to add a bit of salt to most dishes to bring out the flavour of other ingredients. It will not make this taste salty.
Lemon zest – Always welcome in rich things, it brings a touch of brightness to offset some of the creaminess. It doesn’t make this taste like a lemon cheesecake. You need a LOT of zest for a pronounced lemon flavour in cheesecakes, as I found out when creating Lemon Cheesecake for my cookbook!
Close up of inside the filling so you can see how it’s light and aerated inside rather than dense and thick. However, it’s got a gorgeous creamy mouthfeel!
How to make Mini Cheesecakes
Nice and straightforward. And I really like that you can make these cheesecake days in advance! Don’t worry if you don’t have a food processor or electric beater, there’s other means to make this.
1. Base
Blitz – Place the biscuits in a food processor and blitz until they become fine crumbs. It takes about 10 seconds in my food processor. Start by pulsing then blitz on high until done. Then add everything else (melted butter, cinnamon, sugar, salt) and blitz again briefly to combine.
Don’t have a food processor? No problems. Just put the biscuits in a ziplock bag and bash using a rolling pin or large tin. It’s very satisfying!
Wet sand texture – The mixture should look like wet sad and holds together when you pinch it between your fingers. Divide the mixture between paper muffin tin liners sitting in each hole.
Press and flatten the crumbs firmly into the base of each hole using something round with a flat base. A 1/4 cup measure is the perfect tool for me.
Bake for 7 minutes then remove and cool for 5 minutes before topping with the cheesecake filling.
2. Cheesecake filling
The goal with the filling is to make it as smooth as you can yet beating as little possible. This will minimise the amount of air bubbles in the mixture so you don’t end up with bubbles or cracks on the surface.
I assume you’ve figured out that this also means the filling is FAST to make!🙌🏻
Beat – Start by beating the cream cheese until smooth. If it’s properly at room temperature, this should barely take 10 seconds on a medium speed. Then beat in everything else except the eggs, just until smooth.
Don’t have an electric beater? Just make sure the cream cheese is quite soft then just use a handheld whisk / wooden spoon. It works because we aren’t trying to fluff up the cream cheese like we do with butter for things like buttercream frosting. All we want is to make the cream cheese smooth.
Eggs – Beat the eggs in one at a time, just until incorporated.
Batter thickness – The cheesecake filling should be more like a thick pancake batter, rather than a muffin mixture that can be scooped into mounds.
Divide the mixture between the muffin tin holes. Use it all! You can fill the holes up to 3 mm from the rim as the cheesecake does not rise much.
I like to use an ice cream scoop with a lever. It’s very handy for muffins, cupcakes, pancakes, fritters …. AND ice cream!
Bake for 20 minutes at 160°C / 325°F (140°C fan). A lower temperature avoids browning on the surface while gently baking the delicate cheesecake filling.
Once baked, the filling should still be soft and supple in the centre, not rock hard. But not jiggling like there’s liquid underneath. If it’s too soft, pop it back in the oven for a few minutes.
Cool thoroughly on the counter for at least 1 hour.
Fridge – Cover the surface with a sheet of baking/parchment paper then seal with cling wrap. Place in the fridge for at least 6 hours to fully set, preferably overnight.
3. Decorating!
Fully set – Once the mini cheesecakes are thoroughly chilled they will be set enough to pick up.
Peel off the paper liner and place on a serving platter.
Cream – Decorate as you wish! In today’s recipe I’ve gone with Chantilly cream (which is just a fancy name for lightly-sweetened whipped cream) and berries. I’ve piped the cream on using a star tip nozzle but you could also just dollop the cream on using spoons.
Berries – I used small strawberries (halved / quartered), raspberries and blueberries plus a small sprig of mint, all dusted with icing sugar.
More decorating suggestions
Sliced/diced soft tropical fruit like mango, kiwi, peach
Passionfruit – always a nice finishing touch!
A drizzle of chocolate, Nutella or caramel
Colourful sprinkles or silver balls (festive season!)
Fruit compote
Toppings I use for my Strawberry or Blueberry Cheesecakes
The practical stuff: Storage and serving tips
The making part done, I have some practical tips to share with you on serving, storage and assembling so you pull off your dessert without a hitch on party day! In no particular order:
Storage – Keep them in the fridge. They’re excellent for 24 hours after making, and still very, very good at 48 hours. Beyond this the base starts getting softer than is ideal but nobody complains. If needed it keeps for 5 days at least, probably longer. But note the cream will start to deflate after around 24 hours. See tips below for assembling and stabilised cream.
Freezing – The naked cheesecake (ie. no cream) can be frozen for up to 3 months then thawed.
Serve at room temperature – Ideally. Cheesecake is creamier and you can taste more flavours when it’s at room temperature. Though on hot summer days cold cheesecake from the fridge is lovely! In my perfect scenario, I de-chill the cheesecake for 30 minutes to 1 hour, then I decorate just prior to serving.
The practical stuff (continued)
Decorating – Regular freshly whipped cream deflates with time so try to assemble as close to serving as you can. When I really want to impress, I take the Chantilly cream ingredients and equipment with me and whip the cream close to serving.
If I’m feeling more relaxed, I’ll just decorate the cheesecakes prior to leaving my house and put it straight in the fridge when I arrive,. They are fine for a few hours. The cream will deflate a bit but if you whip until stiff it will hold its piped shape for a day.
Stabilised cream – For the best make-ahead results, use a stabilised cream. To do this, switch 1/4 of the (unwhipped) whipping cream with marscapone cheese, a rich Italian soft cheese that tastes like whipped cream but has the texture of spreadable cream cheese.
When you whip marscapone with ordinary cream, the resulting cream stays light and fluffy for far longer than plain whipped cream, ie. it is “stabilised”. It will remain fluffy and near-perfect for 24 to 36 hours. Beyond this, it starts to deflate slightly but is still far superior to plain whipped cream!
And with that, it’s over and out for me!
Time to hand over to you. What do you think of the cheesecake? Is this holiday gatherings-worthy? What will you decorate yours with? Tell me below, I want to know! – Nagi x
Watch how to make it
Hungry for more? Subscribe to my newsletter and follow along on Facebook, Pinterest and Instagram for all of the latest updates.
Mini cheesecakes
Prep: 15 mins
Cook: 27 mins
Chilling: 6 hrs
Sweet Baking
Western
Servings12
Tap or hover to scale
Recipe video above. Fabulously adorable little individual cheesecakes that are perfect for gatherings. They are easier to make than 1 large cheesecake and a whole lot less messy to serve! Decorate with berries and whipped cream, or use the topping from this Strawberry or Blueberry Cheesecake.Please ensure the fridge ingredients are at room temperature so the filling mixture is completely smooth. Nobody wants little lumps in their cheesecake!
Instructions
Base:
Blitz: Break the crackers up with your hands then blitz in a food processor until they form fine crumbs – about 10 seconds or so. (Note 4) Add remaining Base ingredients, blitz to combine. It should have the texture of wet sand.
Press: Divide mixture between the muffin tin holes. Press down firmly to flatten using something flat and round. A 1/3 cup measure fits perfectly in mine my tin holes for this purpose.
Bake: Backe for 7 minutes then cool bases for 5 minutes before filling.
Filling:
Filling (Note 5): Beat cream cheese on speed 5 of an electric beater just until smooth (~ 10 seconds). Add flour, vanilla, sour cream, sugar and lemon. Beat on speed 5 just until combined (~10 seconds). Beat in eggs one at a time just until incorporated. Mixture should be like a thick pancake batter.
Bake filling: Divide mixture between muffin holes. Use it all – you can can go within 3mm of rim as it won’t rise much. Bake for 20 minutes.
Chill: Remove from the oven then cool for 1 hour on the counter in the muffin tin. When cooled, cover with baking/parchment paper then loosely with cling wrap. Refrigerate for at least 6 hours and preferably overnight, or until the liner can be peeled off cleanly.
Decorate and serve:
De-chill: If you have the time, remove cheesecakes from the fridge 30 minutes prior to serving, to take some of the fridge chill out (the cheesecake is nicer at room temperature).
Chantilly cream: Place ingredients in a bowl and beat on high until the cream is thick enough to pipe/dollop.
Decorate: Pipe or dollop with cream, decorate with berries, dust with icing sugar. Serve proudly!
Recipe Notes:
1. Biscuits – I tried a variety of biscuits and found digestive biscuits and graham crackers to be my preference for mini cheesecakes. For graham crackers you will need 1 3/4 cup or 20 squares for 150g.
Marie crackers (commonly used in Australia for cheesecake base which I use for full size cheesecakes) works but needs and extra 90g butter (the base is drier than with digestives).
Use any biscuits you want but you may need to adjust the butter depending on the type so it stays together when you press it in the base. Just make base as-is, then add 1 tbsp (15g) extra melted butter at a time until you get the right texture.
2. Cream cheese – Use block cream cheese as it’s firmer than the spreadable tub variety.
3. Eggs – Use eggs labelled as “large eggs” as they are an industry standard size of around 55g/2oz each. Please ensure they are at room temperature so they incorporate easily in the batter.
4. No food processor? Just put the biscuits in a ziplock bag and bash with a rolling pin or large can. It’s very satisfying!
5. Creating a smooth filling – The goal is to make a smooth mixture with minimal beating so there’s no bubbles on the surface and no cracking risk. Hence the instruction to have all ingredients at room temperature rather than fridge-cold!
6. Peeling off liner – If you want even neater sides, pop the cheesecakes in the freezer for 30 minutes or so, until the sides firm up. The lining will peel off even more cleanly.
7. Serving – Decorate close to serving time ideally. However they can stay in the fridge for a few hours and will be fine! I assemble prior to leaving my house then put it straight in the fridge at the destination.
8. Storage – Cheesecakes will keep in the fridge for up to 5 days. Regular cream will deflate a bit though, that’s just what happens, but it’s still delicious. Stabilised cream is more resistant to deflating while still as airy as normal whipped cream. To make, substitute 1/4 of the unwhipped cream with the same amount of 40% fat marscapone. Whip into cream as usual, and use as per normal cream.
See tips above the recipe video for making ahead and taking to gatherings.
9. Nutrition per cheesecake, excluding toppings.
Nutrition Information:
Calories: 353cal (18%)Carbohydrates: 19g (6%)Protein: 5g (10%)Fat: 29g (45%)Saturated Fat: 17g (106%)Polyunsaturated Fat: 2gMonounsaturated Fat: 8gTrans Fat: 1gCholesterol: 111mg (37%)Sodium: 154mg (7%)Potassium: 107mg (3%)Fiber: 1g (4%)Sugar: 15g (17%)Vitamin A: 1103IU (22%)Vitamin C: 1mg (1%)Calcium: 71mg (7%)Iron: 1mg (6%)
Keywords: Mini cheesecake
Did you make this recipe?I love hearing how you went with my recipes! Tag me on Instagram at @RecipeTinEats.
Life of Dozer
Another Melbourne Cup, another RecipeTin Yakitori backyard BBQ, another Dozer headpiece!
Source by www.recipetineats.com


